Coffee is all about…control. Taking charge of your own enjoyment gives you a sense of accomplishment and satisfaction that just can’t be acquired at a coffee shop.
However, in order to take matters into your own hands, you need to understand the individual and all-important steps to perfecting an espresso shot.

Before you begin to construct this little brew, make sure you have all the right tools:
- Espresso Machine
- Grinder
- Scale
- Portafilter
- Tamper
- Filtered Water
- Coffee
- Timer
Maybe it goes without saying that the quality of your tools dramatically affects the quality of your final product, but let’s say it anyway: if you want coffee shop quality espresso, invest in the best machines and gadgets your budget can afford.
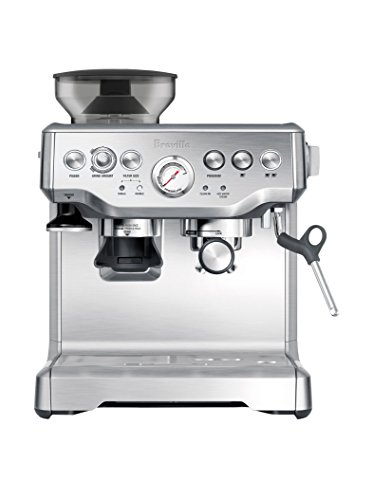
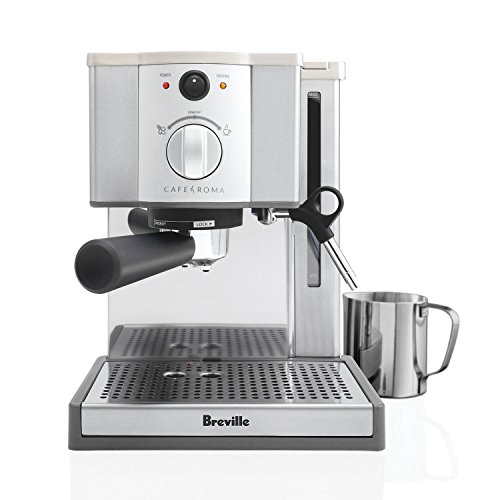
Espresso machines come in all shapes and sizes, with multiple variables like group heads and pre-infusers, and you generally get what you pay for. Don’t skimp on your research, here are a few fantastic machines.
Grinders are the crux of the process. According to the best baristas, if you don’t own a quality burr grinder, just don’t bother making coffee at home. A burr grinder – specifically one with a slow rotating, conical-shape and a powerful motor, far surpasses a blade grinder. Blade grinders, while more affordable, give an inconsistent grind size and generate friction which can cause your grinds to overheat and negatively affect their taste.
Water makes up 95% of your espresso shot, so the quality of your H20 needs to rival the quality of your tools. Use the purest water available, filtering out the chemicals and minerals to give your coffee the cleanest, smoothest flavor possible. Plus, using “soft” water (which has lower levels of calcium and magnesium) also has a positive impact on the long-term performance of your equipment.
Coffee beans should be a dark roast, premium grade and stored in a cool, dry, airtight container to maintain their freshness and integrity.
To begin:
Step 1: Preheat your portafilter and cup by pulling an empty shot (just water, no coffee) through your machine. Having your tools warmed ensures the quality of your espresso.
Step 2: Grind, Grind, Grind
Any good barista will tell you, “It’s all about the grind”. In order to capitalize on the best your beans have to offer, they should be freshly roasted and always ground immediately before brewing (this is true for every coffee-making method). But the texture of the grind is possibly the most crucial aspect of the quality of an espresso shot.
If your grind is too fine then your shot can have a burned, bitter taste. Conversely, if your grind is too coarse and your shot may be watery, weak and sour.
The perfect grind texture for espresso is much like that of granulated sugar, but you may need to test this several times based on your machine and personal preference. No two machines are exactly alike – even within the same brand. Take time to calibrate your equipment and find the right setting for your taste. And you may not be aware, but the humidity plays a factor as well. The more humid the weather, the slower your extraction will be, so you may need to adjust your grind on a regular basis. Take a look at some of these grinders!
There really is a science to it, and it requires practice.
Step 3: Measure, Measure, Measure
The amount of measured coffee you need to fill the portafilter is called the dose. A “double-shot” (the most common way to pull espresso) is about 3 tablespoons of grounds, or somewhere between 14 and 18 grams (hence the need for a scale). Again, this can be adjusted, factoring in your machine and preferences.
Check your machine’s user manual for tips regarding this step.
Step 4: Tamp, Tamp, Tamp
There is an art to the tamp. Tamping is the process of packing your grounds in the portafilter to guarantee even, uniform extraction as the water is forced through the coffee. The proper way is to hold your elbow at a 90-degree angle, prop your portafilter on an even surface, then apply firm pressure until the coffee has a polished, even appearance.
Ultimately, the amount of pressure you use is up to you, just keep in mind that the coarser the grind, the firmer the tamp. Long story short, get one!
Step 5: Brew, Brew, Brew
The portafilter now goes into your espresso machine’s head with your preheated cup placed underneath. They say timing is everything, and that is never more true than with the perfect espresso shot. You goal is 2 ounces flowing steadily through in a thin stream, over the course of 20 to 30 seconds.
Watch your timer and practice this step until you get it exactly right. Ideally, your shot should start out very dark (the first ounce) and then turn into a lovely, rich, golden brown foam (the crema) in your cup. When the foam begins to whiten, remove your cup. If you can’t seem to get the timing of this step just right, go back and check your grind, dose, and tamp.
Many variables affect your espresso, from bean to machine, so have fun with the experimentation until you can pull the perfect shot like a pro!